NOTE: I'm basically dropping links related to the DEF CON 26 badge. Once I get the time to work on the badge, my findings will follow.
Hackaday
https://hackaday.com/2018/08/09/first-look-at-def-con-26-official-badge/
Arstechnica
https://arstechnica.com/information-technology/2018/08/honoring-the-80s-defcons-badge-is-also-a-text-adventure/
Badge Emulator
https://github.com/m0n73/dc26_BadgeEmulator
Flash the firmware?
https://www.reddit.com/r/Defcon/comments/96t4w9/we_got_a_green_badge/
Mega-Info Link
http://www.deaddialect.com/articles/2018/8/17/badge-story
Reddit: Terminal Recordings
https://www.reddit.com/r/Defcon/comments/986m1c/def_con_26_badges_terminal_recordings/
The green "E" hack.
https://www.reddit.com/r/Defcon/comments/99lfny/fixed_one_of_the_dc26_badge_bugs_to_get_a_green_e/
2018-07-29
Hacker Summer Camp Check List - 2018
UPDATED: 2018.0731
Every year I go through an exercise of sorting through all my gear to figure out which ones I will bring to hacker summer camp. I always end up bringing more than I need. But just like any of you, I go by “it’s better to have and not need than to need and not have”. Don’t deny it… you can all look in your garages, basements and storage units and see how much hacking stuff you’ve accumulated through the years. And if you’re just starting out, give it a couple of years, and you’ll see what I mean.
NOTE: It's your first DEF CON!?! Awesome, welcome to hacker summer camp! See the DEF CON 3-2-1 Rules below.
Here is my basic hacker summer camp check list:
CASH:
Bring cash, you'll need it for registration. Using ATMs in or near the con's vicinity is not advised.
LAPTOP and CELL PHONE: (Don't use your work issued laptop or cell)
(1) Burner Laptop
I dual-boot with Kali and Windows. Kali being my main OS, I would also setup a variety of backup VMs in Virtual Box. Test and get familiar with your VMs before you go.
(1) Burner Cellphone
You'll need one to constantly be in touch with your hacker group. Also helps in keeping
tabs on happenings during the con. (Note: If you have an Android, you can look into creating a separate user profile with limited functionality.)
 <<eBay is your friend when looking for gear for occasional use. Remember that these are not your daily comm gear. You do not need the latest or greatest models or versions.>>

(2) Baofeng Radios UV5R
POWER / ELECTRICITY:
(1) Portable Charger
You’ll need it to charge your phone, and power your #badgelife addiction.
You’ll need it to charge your phone, and power your #badgelife addiction.
(2) Power Strips
Get a small one to carry around with you, and a big one for your hotel room. It'll be a plus if your power strip has built in USB charging ports.

Get a small one to carry around with you, and a big one for your hotel room. It'll be a plus if your power strip has built in USB charging ports.

<<This is the power strip I use. The USB ports are 2.4v each. It saves you from bringing a bunch of power adapters when travelling.>>
(20+) Batteries – AAA, AA, 9-Volts, CR2032, Li-Po
Batteries are always a premium at the con. Bring a lot and share...
(20+) Batteries – AAA, AA, 9-Volts, CR2032, Li-Po
Batteries are always a premium at the con. Bring a lot and share...
STORAGE:
(1) Portable External Hard Drive 1-2 TB
I'd keep all things downloaded from the con in this drive. Including files and tools you used on your burner laptop during the con.
(10-15) Variety of Memory Cards - I know it's a lot. You really never know what you'll need until you get deep into some challenges. The only ones I actually end up using are the bootables with the Linux distros.

NETWORKING:
(1) 5-Port Switch
(1) Portable WiFi Travel
Router
(1) Hi-Gain USB Wireless Long Range Network Adapter
(1) Network Tap
(1) Network Tap
(1) HackRF
(1) Ubertooth
I like network packets, so I need all of these.
I like network packets, so I need all of these.
CABLES:
(2) 15’ network cables
(Variety) USB cables all
kinds – mini, micro, USB-C etc. If you can find an all-in-one cable even better.
 <<Here's the one I use. It'll charge an Apple, Android and USB-C phones.

(1) HDMI cable
MISC:
- RFID Blocking Sleeve - you are attending hacking con.
- Duct Tape - if you can't fix it...
- Super Glue - broke it? glue it back together.
- Zip Ties - for keeping things together and other security applications.
- Multi-Tool with Pliers - brute force tools and cutting tools are most welcome.
- Masking Tape - see Duct Tape
- Hot Glue Gun - level up for Super Glue
- Screwdriver Set - level up for multi-tool
- Permanent Markers - someone always needs one.
- Portable Speakers - some #badgelife toys might need it.
EXTRAS: (Village Specific Tools)
- Lock Pick Set

- Soldering kit
- Multimeter
SWAG:
Stickers to trade
Hacker Challenge Coins and Poker Chips
Hacker T-Shirts to trade
Booze for goon bribery.
==========================================================
DEF CON 3-2-1 Rule
In addition to the list of gear, you will also need personal items. Let the DEF CON 3-2-1 Rule be your guide. Please take note the guide is a minimum recommendation. Let's get started...
At a minimum, 3 hours of sleep a day. Sleep, yes, sleep. Your brain needs it. <Pajamas, toothpaste, tooth brush..etc.>
At a minimum, 2 meals a day. You will need to eat for energy. Booze and beer all day will only take you so far.... Have snacks <Trail mix, power bars, beef jerky, breath mints,...etc.> in your bag because with everything happening around you will most likely contract a case of *FOMO. Set aside a couple of hours to eat. Drink water! It helps if you plan to party all night.
At a minimum, 1 shower a day. Showers are good not only for you but also for the rest of us. <3-4 days worth of change of clothes (includes under garments, socks...etc.), shampoo, soap, deodorant, mouthwash ...etc.> "You plus deodorant = everyone wins." Try to avoid crowded elevators on the 3rd day of hacker summer camp. You can thank me later.
*FOMO - "Fear of missing out"
2018-04-06
Some Defense Against the Dark Arts.
2018.0406 Note: This post has been sitting in my draft files for a long while. It's old but it should still be pretty significant today.
===============
If you have ever visited the Wall of Sheep (WoS) at the Packet Hacking Village (PHV) in DEF CON and just decided to sight see, that's all good. If you were to take away anything from that short visit, we hope you took note of the discretely posted warnings on posters, t-shirts and stickers. Too often, media postings will say that WoS' goal is too shame unsuspecting attendees. Well, I assure you that is not the intent. The WoS mission has always been education, awareness and protection. Here are some of the messages that have been used by PHV thru the years...
"SECURITY AWARENESS FOR THE FLOCK"
"Don't Get Caught Without Encryption"
"On The Air, Beware..."
With that said, let's start with the basics....at a minimal use VPN. The following is ripped from NordVPNs Linux install page. I do not work for NordVPN, but they do claim total anonymity including taking payments with gift cards (Starbucks, GAP, Old Navy...etc.) There are free VPN services out there like VPNBook, but they did not indicate if they are logging or not.
How to connect to OpenVPN via shell:
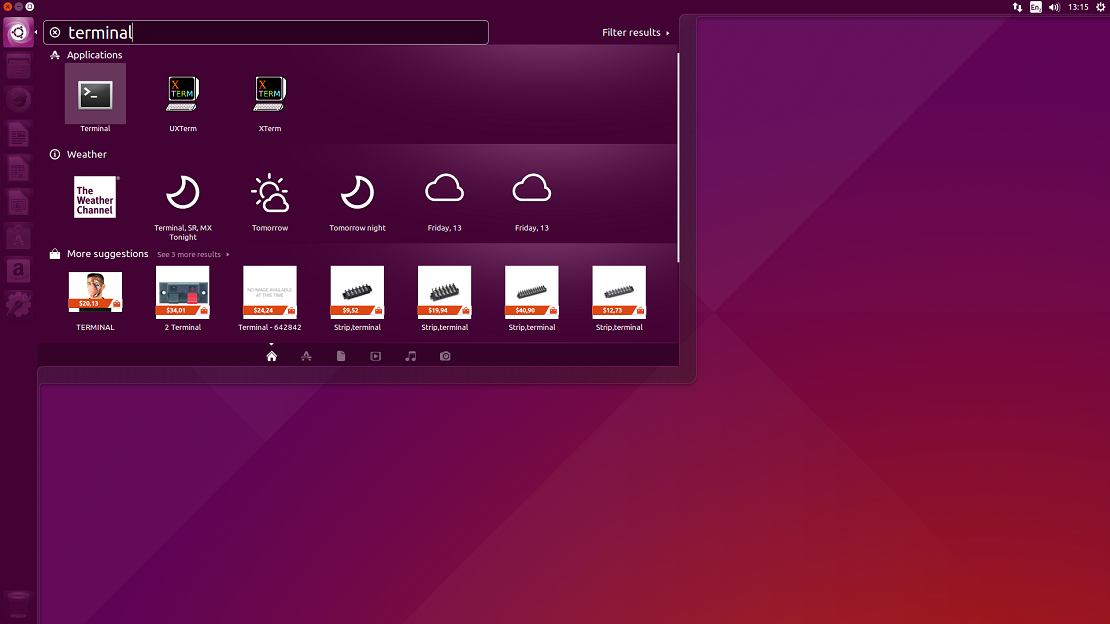
1. Open terminal (keyboard shortcut: Ctrl + Alt + T).
2. Install OpenVPN client by entering `sudo apt-get install openvpn` (if you are requested a password, enter the password which you have used when creating your account).
3. Navigate to OpenVPN configuration directory with command `cd /etc/openvpn`
4. Download OpenVPN configuration files with command `sudo wget https://nordvpn.com/api/files/zip`
4.1. In case you will get `ERROR: The certificate of `nordvpn.com’ is not trusted.`, please install `ca-certificates` package with command `apt-get install ca-certificates`
5. If you do not have `unzip` package installed, download it by typing in `sudo apt-get install unzip`
6. Extract `config.zip` with command `sudo unzip zip`
7. Remove files which will be no longer used: `sudo rm zip`
8. To see the list of all available servers, simply enter `ls -al` command and it will print full configuration file list.
9. Choose a server which you would like to connect to.
10. Start OpenVPN with a chosen configuration by entering `sudo openvpn [file name]` (for example: `sudo openvpn at1.nordvpn.com.udp1194.ovpn`).
11. OpenVPN will ask you for credentials, so simply enter those in with your NordVPN account credentials.
12. You have successfully connected to VPN. To disconnect from the OpenVPN connection simply open terminal and press Ctrl + C on your keyboard.
How to connect to OpenVPN via Network Manager:
1. Open Terminal, Applications->Accessories->Terminal
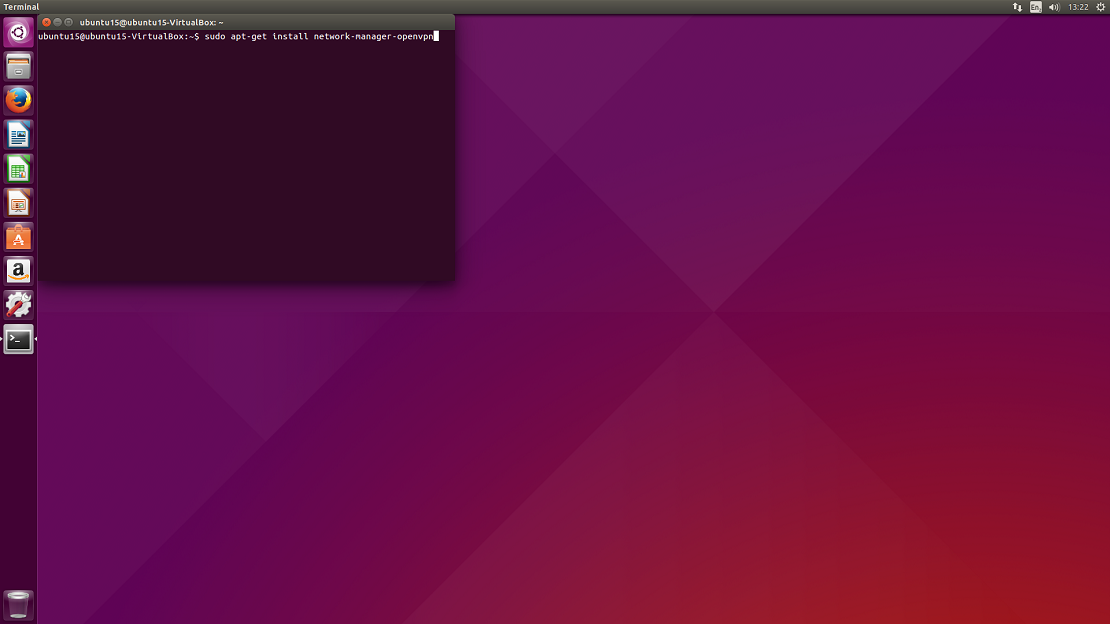
2. Install network-manager-openvpn by typing in Terminal:
sudo apt-get install network-manager-openvpn-gnome
Press Enter (Enter password if it needed).
3. You will be prompted: Do you want to continue? Y/n Type Y and hit Enter.
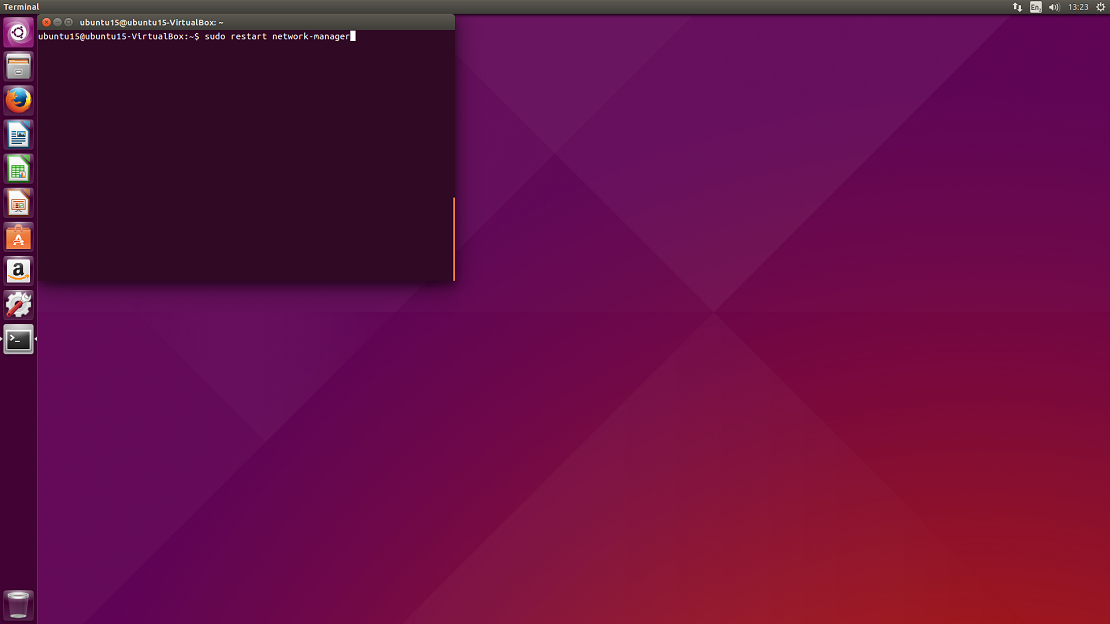
4. Once installation is complete, restart Network Manager by typing:
sudo restart network-manager
Press Enter.
5. Network-manager is now running. Now download OpenVPN configuration files package from: .ovpn file package and CA & tls-auth certificate file package: CA and TLS certificates and extract them.
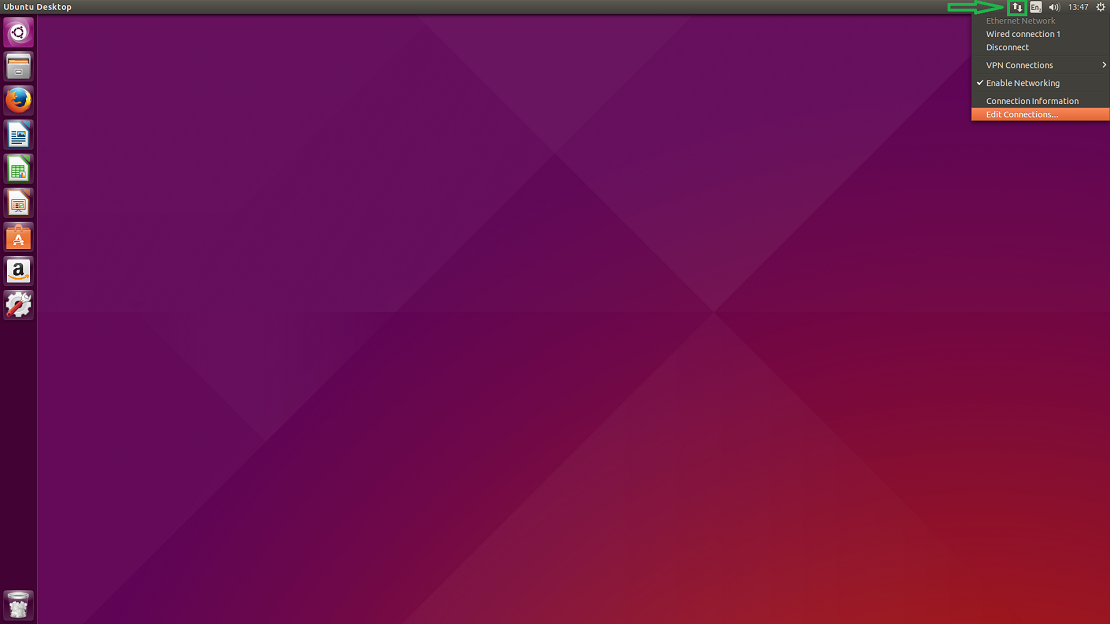
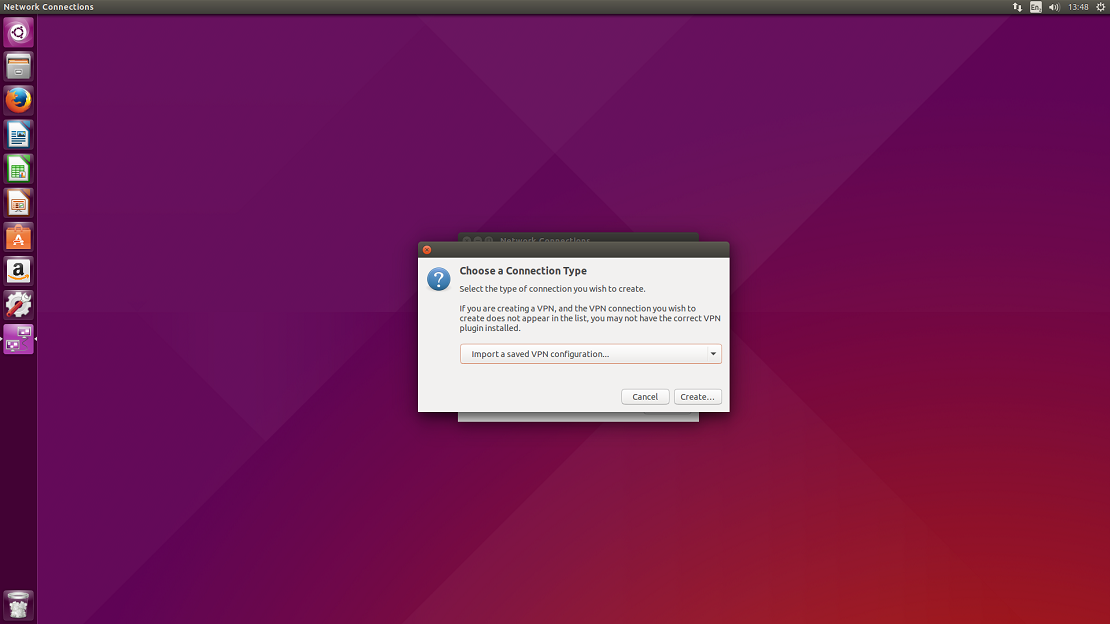
6. Click on the double arrow button at the top right of the screen and then select Edit Connections… from the drop-down.
7. You will be prompted to choose a connection type. Select Import a saved VPN configuration… and click on Create…
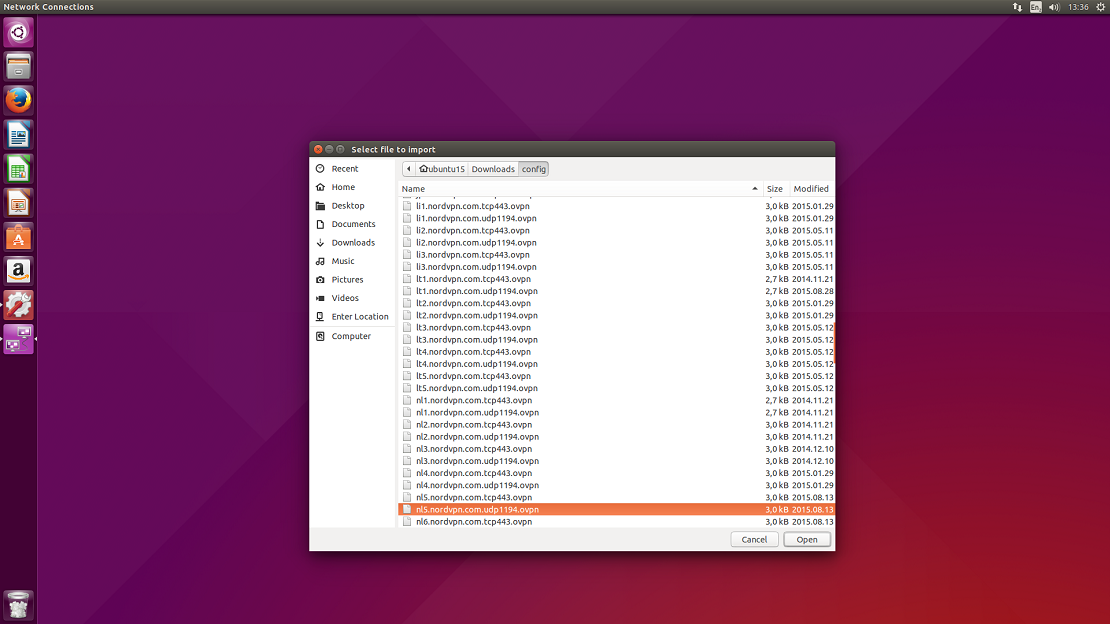
8. You will be prompted a window to select a file that you would like to import. Please navigate to a folder where you have extracted the configuration files and select one of the files from the list and click Open. You can check what file corresponds which server at our server list.
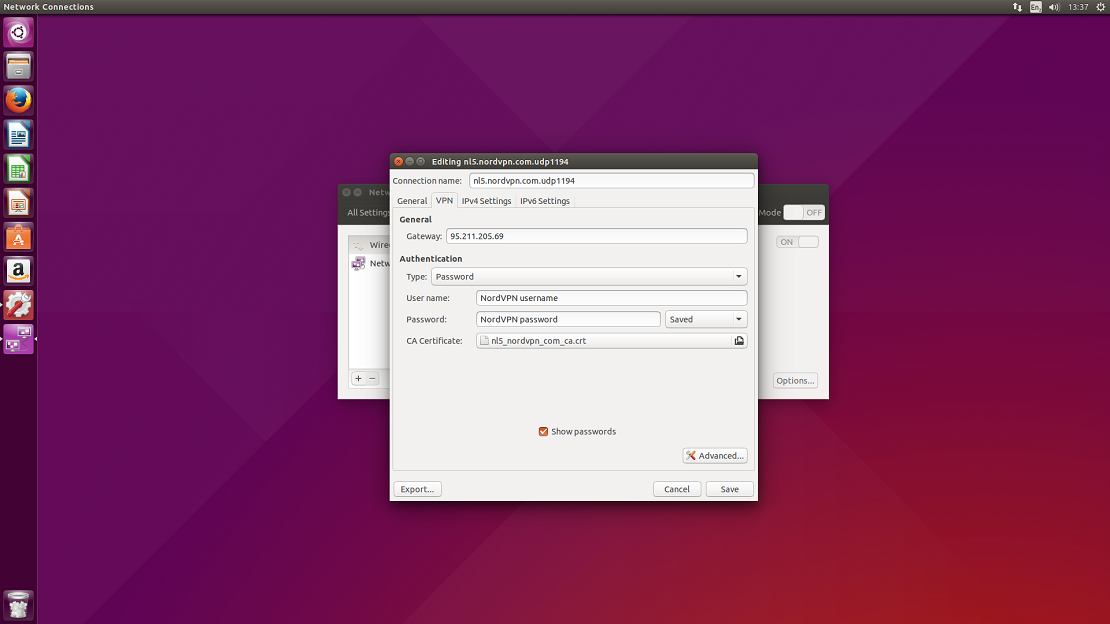
9. In the popped window select VPN tab.
GENERAL
Gateway: an IP or the hostname of the server (usually the server IP is already set in).
AUTHENTICATION
Type: Password;
User name: Your NordVPN username;
Password: Your NordVPN password;
CA Certificate: select a corresponding .crt file to the server which you are setting up, from the certificate file which you have downloaded previously.
Click on Advanced…
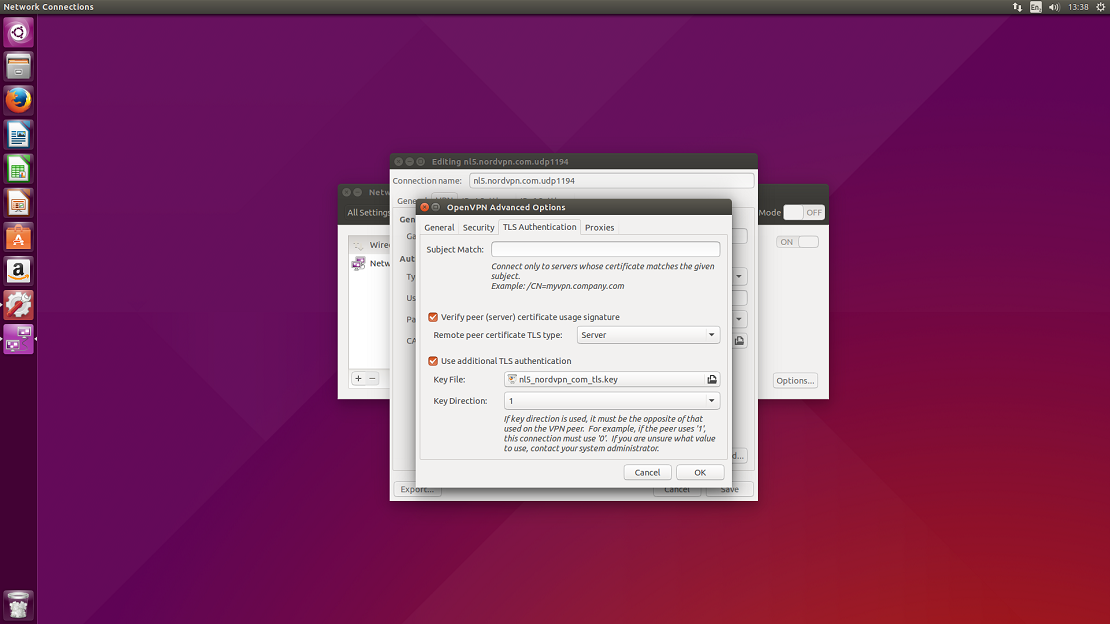
10. Open TLS Authentication tab.
Subject match: leave blank;
Verify peer (server) certificate usage signature: check and select Server;
Use additional TLS authentication: check;
Key file: select a corresponding .key file to the server which you are setting up, from the certificate file which you have downloaded previously;
Key direction: 1.
Click Ok and Save the configuration.
11. Now click on the double arrow button at the top right of the screen again and then select VPN connections from the drop-down.
Select the server which you have set up and click on it.
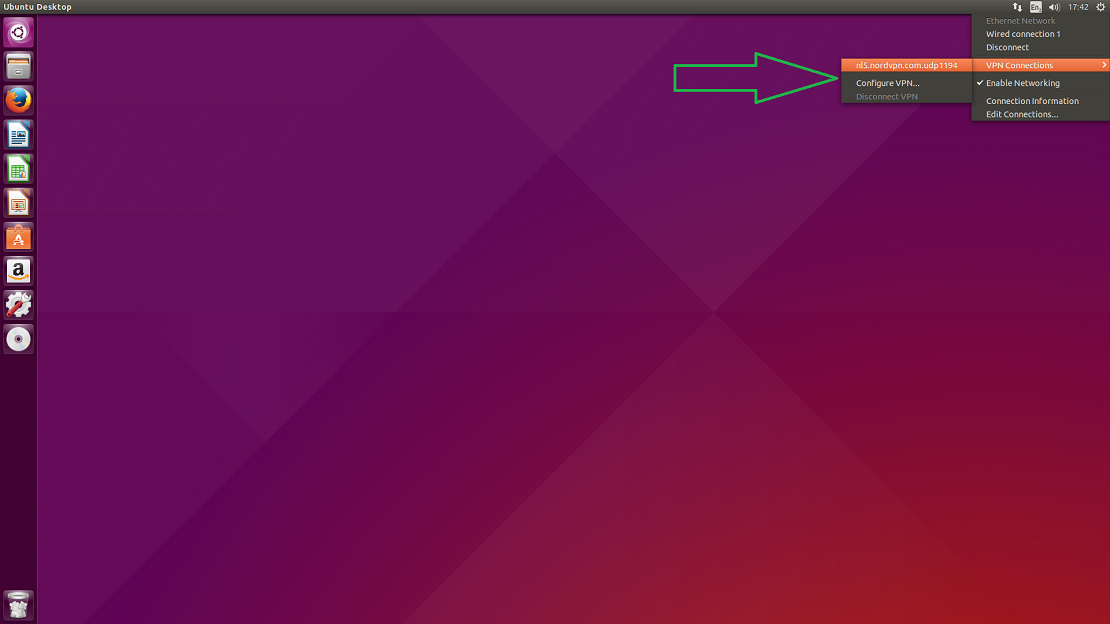
Congrats! You are connected to VPN. In NordVPN’s site you can check if the connection works well for you. Refresh the website and check if the status is shown as Secured. Until next time friends!
===============
If you have ever visited the Wall of Sheep (WoS) at the Packet Hacking Village (PHV) in DEF CON and just decided to sight see, that's all good. If you were to take away anything from that short visit, we hope you took note of the discretely posted warnings on posters, t-shirts and stickers. Too often, media postings will say that WoS' goal is too shame unsuspecting attendees. Well, I assure you that is not the intent. The WoS mission has always been education, awareness and protection. Here are some of the messages that have been used by PHV thru the years...
"SECURITY AWARENESS FOR THE FLOCK"
"Don't Get Caught Without Encryption"
"On The Air, Beware..."
With that said, let's start with the basics....at a minimal use VPN. The following is ripped from NordVPNs Linux install page. I do not work for NordVPN, but they do claim total anonymity including taking payments with gift cards (Starbucks, GAP, Old Navy...etc.) There are free VPN services out there like VPNBook, but they did not indicate if they are logging or not.
How to connect to OpenVPN via shell:
1. Open terminal (keyboard shortcut: Ctrl + Alt + T).
2. Install OpenVPN client by entering `sudo apt-get install openvpn` (if you are requested a password, enter the password which you have used when creating your account).
3. Navigate to OpenVPN configuration directory with command `cd /etc/openvpn`
4. Download OpenVPN configuration files with command `sudo wget https://nordvpn.com/api/files/zip`
4.1. In case you will get `ERROR: The certificate of `nordvpn.com’ is not trusted.`, please install `ca-certificates` package with command `apt-get install ca-certificates`
5. If you do not have `unzip` package installed, download it by typing in `sudo apt-get install unzip`
6. Extract `config.zip` with command `sudo unzip zip`
7. Remove files which will be no longer used: `sudo rm zip`
8. To see the list of all available servers, simply enter `ls -al` command and it will print full configuration file list.
9. Choose a server which you would like to connect to.
10. Start OpenVPN with a chosen configuration by entering `sudo openvpn [file name]` (for example: `sudo openvpn at1.nordvpn.com.udp1194.ovpn`).
11. OpenVPN will ask you for credentials, so simply enter those in with your NordVPN account credentials.
12. You have successfully connected to VPN. To disconnect from the OpenVPN connection simply open terminal and press Ctrl + C on your keyboard.
How to connect to OpenVPN via Network Manager:
1. Open Terminal, Applications->Accessories->Terminal
2. Install network-manager-openvpn by typing in Terminal:
sudo apt-get install network-manager-openvpn-gnome
Press Enter (Enter password if it needed).
3. You will be prompted: Do you want to continue? Y/n Type Y and hit Enter.
4. Once installation is complete, restart Network Manager by typing:
sudo restart network-manager
Press Enter.
5. Network-manager is now running. Now download OpenVPN configuration files package from: .ovpn file package and CA & tls-auth certificate file package: CA and TLS certificates and extract them.
6. Click on the double arrow button at the top right of the screen and then select Edit Connections… from the drop-down.
7. You will be prompted to choose a connection type. Select Import a saved VPN configuration… and click on Create…
8. You will be prompted a window to select a file that you would like to import. Please navigate to a folder where you have extracted the configuration files and select one of the files from the list and click Open. You can check what file corresponds which server at our server list.
9. In the popped window select VPN tab.
GENERAL
Gateway: an IP or the hostname of the server (usually the server IP is already set in).
AUTHENTICATION
Type: Password;
User name: Your NordVPN username;
Password: Your NordVPN password;
CA Certificate: select a corresponding .crt file to the server which you are setting up, from the certificate file which you have downloaded previously.
Click on Advanced…
10. Open TLS Authentication tab.
Subject match: leave blank;
Verify peer (server) certificate usage signature: check and select Server;
Use additional TLS authentication: check;
Key file: select a corresponding .key file to the server which you are setting up, from the certificate file which you have downloaded previously;
Key direction: 1.
Click Ok and Save the configuration.
11. Now click on the double arrow button at the top right of the screen again and then select VPN connections from the drop-down.
Select the server which you have set up and click on it.
Congrats! You are connected to VPN. In NordVPN’s site you can check if the connection works well for you. Refresh the website and check if the status is shown as Secured. Until next time friends!
Network Probe with a Raspberry Pi
From Cloudshark's - Building a network capture probe with Raspberry Pi
Published: 2016.0331
Here are the basics -
Published: 2016.0331
Here are the basics -
- Install dumpcap on your Raspberry Pi (it
comes as part of the tshark package): sudo apt-get install tshark
- Download
our script: wget https://github.com/cloudshark/cloudshark-capture/archive/master.zip and unpack the
script.
- Edit
the api_token variable
up at the top and insert your API token. You can change the promptvariable to y which will let the script
ask you before uploading to CloudShark.
- If
you’re using your own CloudShark system, enter the URL in the cloudshark_url variable.
Otherwise leave it as https://www.cloudshark.org/ .
- Make
the script executable: chmod +x cloudshark_capture.sh
- Run
the script and pass it any arguments you would normally pass to
dumpcap/tshark. For example, if you want to capture 5 packets on interface
eth0: ./cloudshark_capture.sh
-i eth0 -c 5
- Grab
the returned URL and paste into your browser!
Now get creative, and figure out other practical applications.
Subscribe to:
Posts (Atom)