Showing posts with label hacking. Show all posts

2018-04-06

Some Defense Against the Dark Arts.

2018.0406 Note: This post has been sitting in my draft files for a long while.  It's old but it should still be pretty significant today.  

===============

If you have ever visited the Wall of Sheep (WoS) at the Packet Hacking Village (PHV) in  DEF CON and just decided to sight see, that's all good. If you were to take away anything from that short visit, we hope you took note of the discretely posted warnings on posters, t-shirts and stickers.  Too often, media postings will say that WoS' goal is too shame unsuspecting attendees.  Well, I assure you that is not the intent.  The WoS mission has always been education, awareness and protection.  Here are some of the messages that have been used by PHV thru the years...

"SECURITY AWARENESS FOR THE FLOCK"
"Don't Get Caught Without Encryption"
"On The Air, Beware..."

With that said, let's start with the basics....at a minimal use VPN.  The following is ripped from NordVPNs Linux install page.  I do not work for NordVPN, but they do claim total anonymity including taking payments with gift cards (Starbucks, GAP, Old Navy...etc.)  There are free VPN services out there like VPNBook, but they did not indicate if they are logging or not.

How to connect to OpenVPN via shell:
1. Open terminal (keyboard shortcut: Ctrl + Alt + T).
2. Install OpenVPN client by entering `sudo apt-get install openvpn` (if you are requested a password, enter the password which you have used when creating your account).
3. Navigate to OpenVPN configuration directory with command `cd /etc/openvpn`
4. Download OpenVPN configuration files with command `sudo wget https://nordvpn.com/api/files/zip`
4.1. In case you will get `ERROR: The certificate of `nordvpn.com’ is not trusted.`, please install `ca-certificates` package with command `apt-get install ca-certificates`
5. If you do not have `unzip` package installed, download it by typing in `sudo apt-get install unzip`
6. Extract `config.zip` with command `sudo unzip zip`
7. Remove files which will be no longer used: `sudo rm zip`
8. To see the list of all available servers, simply enter `ls -al` command and it will print full configuration file list.
9. Choose a server which you would like to connect to.
10. Start OpenVPN with a chosen configuration by entering `sudo openvpn [file name]` (for example: `sudo openvpn at1.nordvpn.com.udp1194.ovpn`).
11. OpenVPN will ask you for credentials, so simply enter those in with your NordVPN account credentials.
12. You have successfully connected to VPN. To disconnect from the OpenVPN connection simply open terminal and press Ctrl + C on your keyboard.

How to connect to OpenVPN via Network Manager:

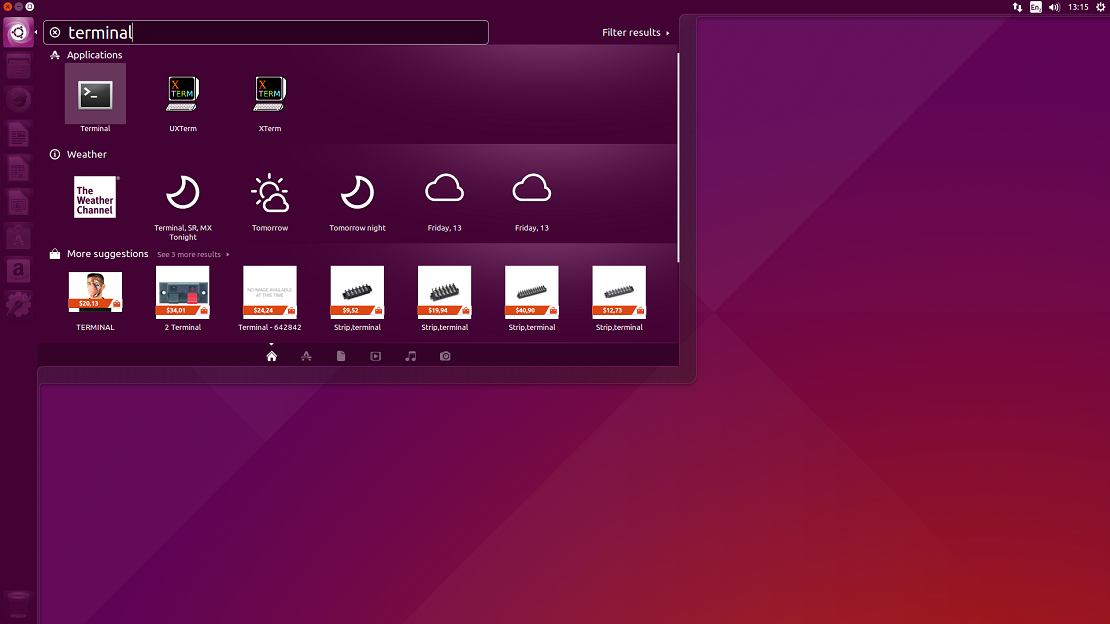
1. Open Terminal, Applications->Accessories->Terminal
LinuxOpenVPN1
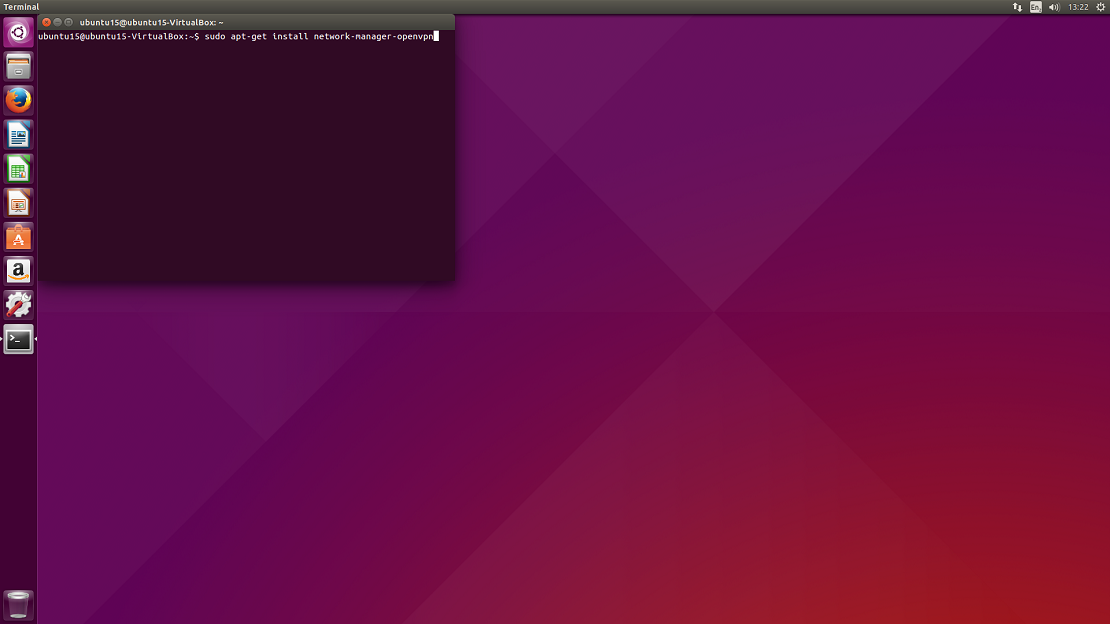
2. Install network-manager-openvpn by typing in Terminal:
sudo apt-get install network-manager-openvpn-gnome
Press Enter (Enter password if it needed).
LinuxOpenVPN2
3. You will be prompted: Do you want to continue? Y/n Type Y and hit Enter.
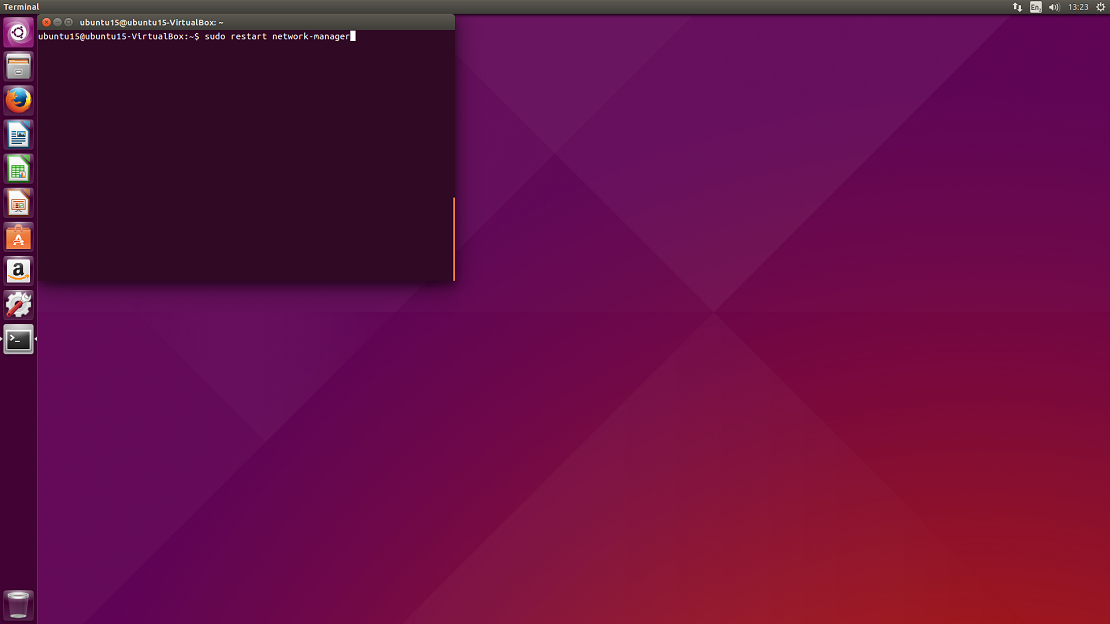
4. Once installation is complete, restart Network Manager by typing:
sudo restart network-manager
Press Enter.
LinuxOpenVPN4
5. Network-manager is now running. Now download OpenVPN configuration files package from: .ovpn file package and CA & tls-auth certificate file package: CA and TLS certificates and extract them.
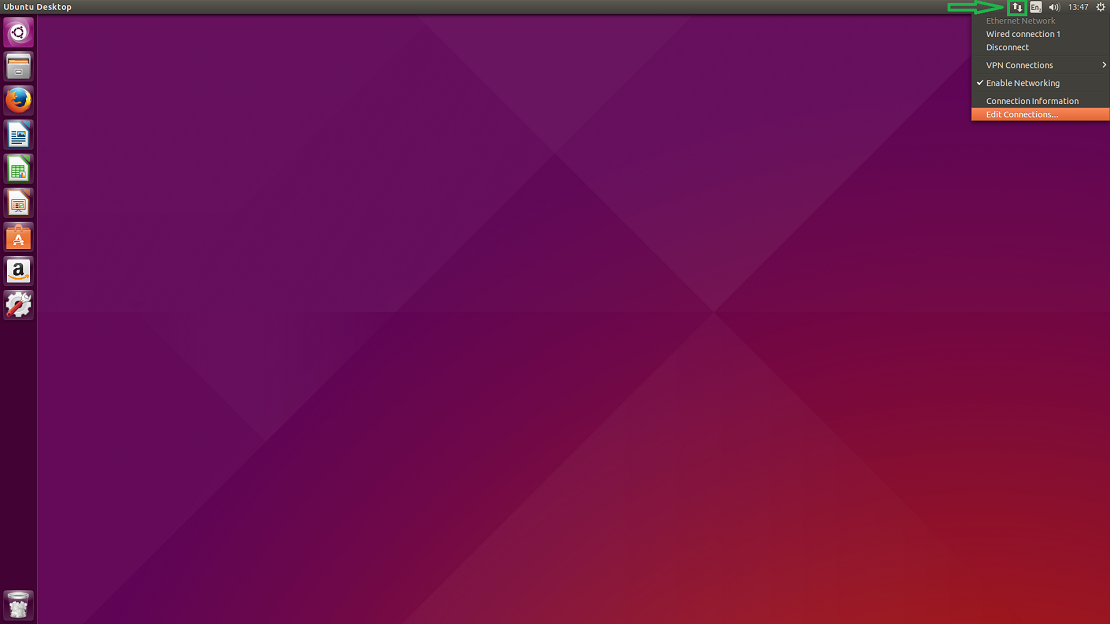
6. Click on the double arrow button at the top right of the screen and then select Edit Connections… from the drop-down.
LinuxOpenVPN6
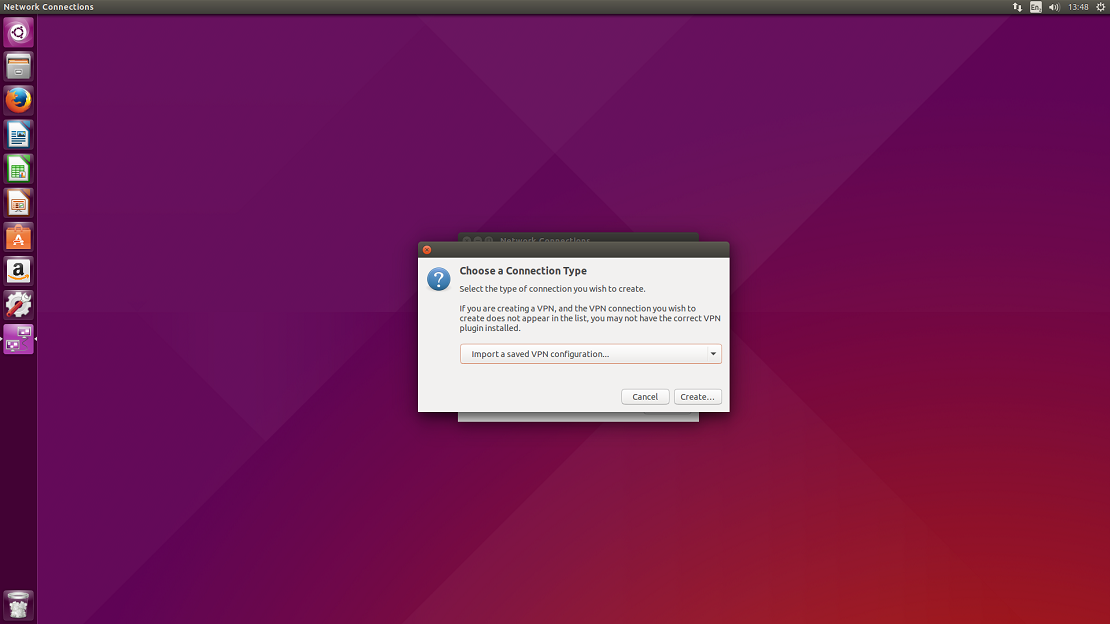
7. You will be prompted to choose a connection type. Select Import a saved VPN configuration… and click on Create…
LinuxOpenVPN7

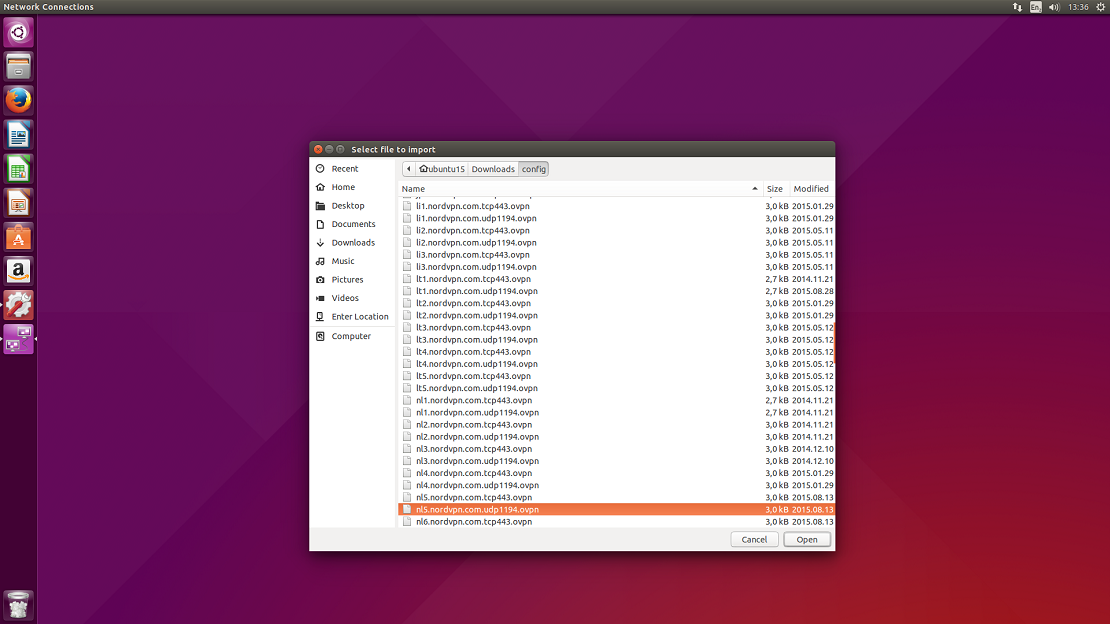
8. You will be prompted a window to select a file that you would like to import. Please navigate to a folder where you have extracted the configuration files and select one of the files from the list and click Open. You can check what file corresponds which server at our server list.
LinuxOpenVPN8
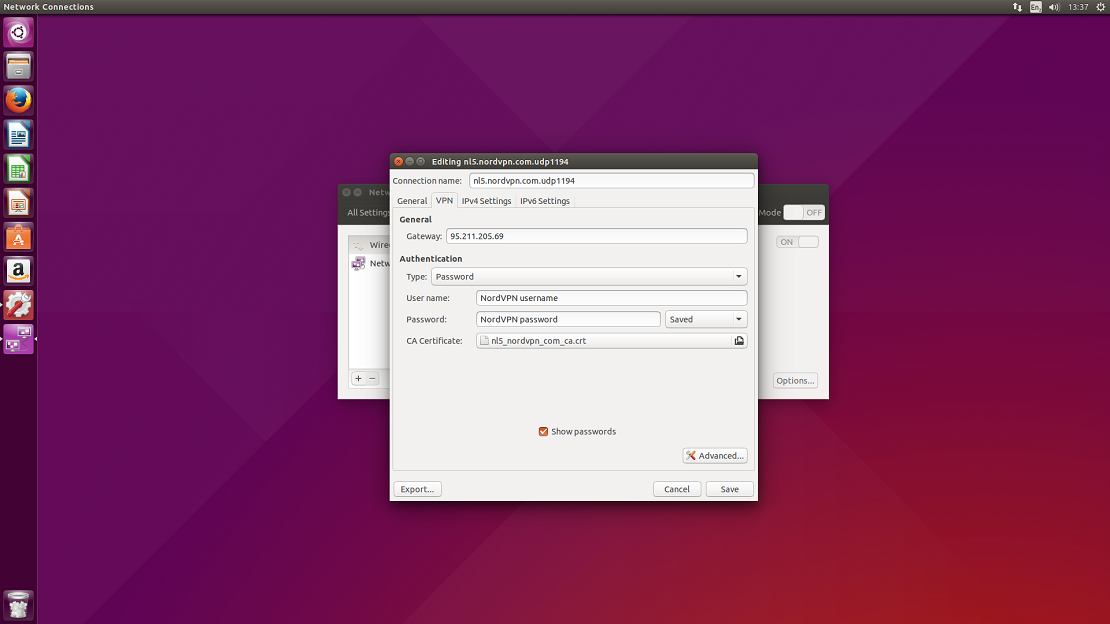
9. In the popped window select VPN tab.
GENERAL
Gateway: an IP or the hostname of the server (usually the server IP is already set in).
AUTHENTICATION
Type: Password;
User name: Your NordVPN username;
Password: Your NordVPN password;
CA Certificate: select a corresponding .crt file to the server which you are setting up, from the certificate file which you have downloaded previously.
Click on Advanced…
LinuxOpenVPN9

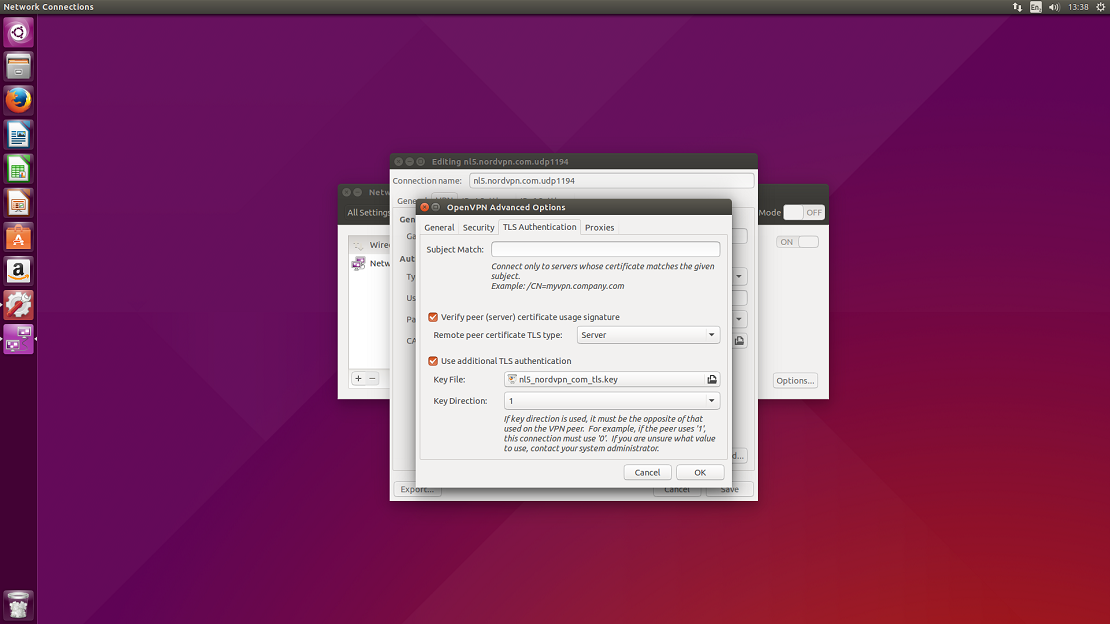
10. Open TLS Authentication tab.
Subject match: leave blank;
Verify peer (server) certificate usage signature: check and select Server;
Use additional TLS authentication: check;
Key file: select a corresponding .key file to the server which you are setting up, from the certificate file which you have downloaded previously;
Key direction: 1.
Click Ok and Save the configuration.
LinuxOpenVPN10

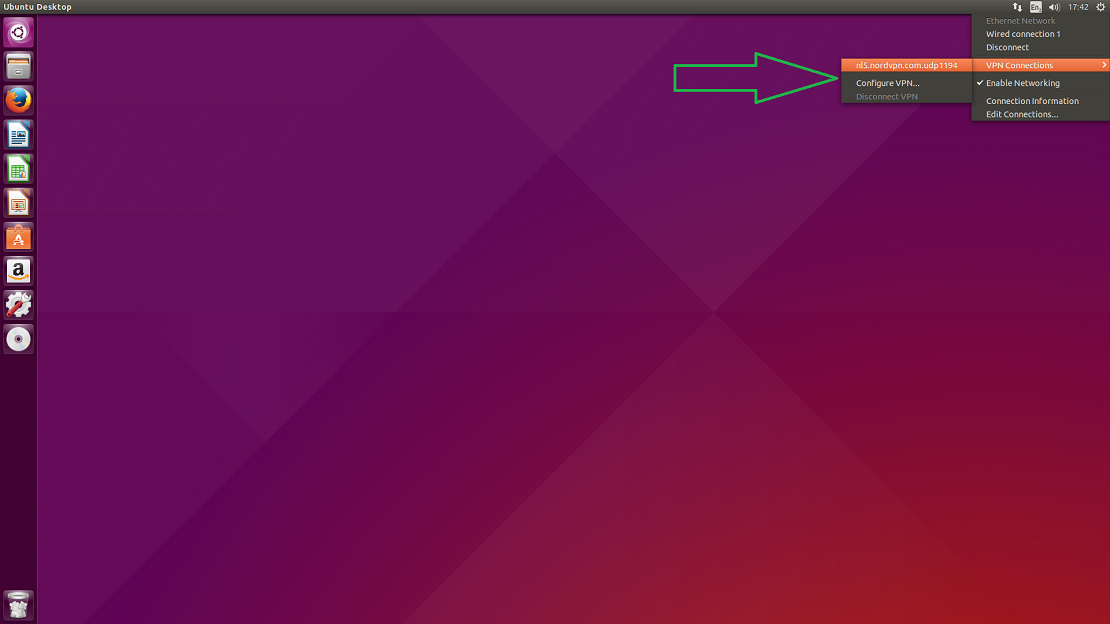
11. Now click on the double arrow button at the top right of the screen again and then select VPN connections from the drop-down.
Select the server which you have set up and click on it.
LinuxOpenVPN11

Congrats! You are connected to VPN. In NordVPN’s site you can check if the connection works well for you. Refresh the website and check if the status is shown as Secured. Until next time friends!

2016-01-28

2016.0128.WHY.FIGHT

SOURCE: 
http://resources.infosecinstitute.com/wifite-walkthrough-part-1/#article
http://resources.infosecinstitute.com/wifite-walkthrough-part-2/#article

WHAT IS IT?
In this article series, we will look at a tool named Wifite suitable for automated auditing of wireless networks. Most of you who have experience in wireless pentesting would use tools like airmon-ng, aireplay-ng, airodump-ng, aircrack-ng to crack wireless networks. This would involve a sequence of steps, like capturing a specific numbers of IV’s in case of WEP, capturing the WPA handshake in case of WPA etc, and then subsequently using aircrack-ng to crack the password required for  authentication to the network. Wifite aims to ease this process by using a wrapper over all these tools and thus making it super easy to crack Wifi networks.
Ethical Hacking Training – Resources (InfoSec)

Here is a list of features of Wifite as per its official homepage.
  • sorts targets by signal strength (in dB); cracks closest access points first
  • automatically de-authenticates clients of hidden networks to reveal SSIDs
  • numerous filters to specify exactly what to attack (wep/wpa/both, above certain signal strengths, channels, etc)
  • customizable settings (timeouts, packets/sec, etc)
  • “anonymous” feature; changes MAC to a random address before attacking, then changes back when attacks are complete
  • all captured WPA handshakes are backed up to wifite.py’s current directory
  • smart WPA de-authentication; cycles between all clients and broadcast deauths
  • stop any attack with Ctrl+C, with options to continue, move onto next target, skip to cracking, or exit
  • displays session summary at exit; shows any cracked keys
  • all passwords saved to cracked.txt
  • built-in updater: ./wifite.py -upgrade

RECOMMENDED WIRELESS CARD
Before we start using wifite, make sure you have a proper wireless card that supports packet injection. If you don’t have one, i would suggest that you buy this card.

ALFA 1000mW 1W 802.11b/g USB Wireless WiFi network Adapter with 5dBi Antenna


"aireplay-ng" bug info and fix
Note that there is a bug in Wifite that may or may not be there in your particular version of Wifite. The bug basically doesn’t aireplay-ng to function properly and displays an error like aireplay-ng exited unexpectedly . In order to fix this, you will have to make slight modifications in the code of wifite. You can install gedit (apt-get install gedit) which is a text editor and then edit the wifite python script (found in /usr/bin/wifite) using the steps mentioned here. To open wifite, use the command gedit /usr/bin/wifite. This will open up the source code of wifite. Then replace every occurence of cmd = [‘aireplay-ng’, with cmd = [‘aireplay-ng’,’–ignore-negative-one’,

UPDATE to the latest version
Wifite can be found under Applications -> Kali Linux -> Wireless Attacks -> 802.11 Wireless Tools. Also, note that if you are running wifite in a different VM than Kali Linux, then you have to make sure that tools like airmon-ng, aireplay-ng, airodump-ng, aircrack-ng are already installed on that system. This is because Wifite is nothing but a wrapper over all these tools. Before we even start using Wifite, it is better to update to the latest version.


LIST ALL THE COMMANDS and SWITCHES 
In my case, i already have the latest version. In this tutorial, we will be targeting a simple Wifi network with WEP encryption. Just using the command wifite -h will give you a list of all the commands.


Crack some WEP
A very tempting option would be -all which tries to attack every network that it finds. We will try it in later articles in this series. However, first lets take a look at all the targets that we have. To do that, use the command wifite -showb


Once this is done, we can see that wifite has put our network interface card into monitor mode (using airmon-ng) and started to look for clients. After a few more seconds, it will start displaying the list of access points.


Note that as it is mentioned in its feature list (automatically de-authenticates clients of hidden networks to reveal SSIDs), this list will also include hidden access points. Hence, wifite can also be used to find hidden access points. In this case we will attack an access point with the BSSID 00:26:75:02:EF:65 that i have set up for testing purposes. The access point has a simple WEP password 1234567890.


To start attacking an access point, just press Ctrl+C. Wifite will now ask you to choose a target number from the list. The target number for my test network is 1, so let me enter that. Note that if you press Ctrl+C again, it will quit Wifite.


You can now see that Wifite will start attempting to crack the WEP access point using the different known techniques for cracking WEP encryption. After some unsuccessful tries, it has finally begun to start attacking the access points using different techniques for cracking WEP.


Once enough IV’s are being captured, it will automatically start cracking the password.


As we can see, Wifite has successfully figured out the WEP key for the access point. Wifite is an extremely useful tool for cracking wireless networks. As i mentioned previously, you need to have all the tools like airmon-ng, aireplay-ng, airodump-ng, aircrack-ng already installed on your system. To further prove the point, let’s dive into the source code of Wifite.


As we can see, the python code has mentions of calling aireplay-ng. Hence, it is recommended to run Wifite inside Kali linux.  


Crack some WPA
In this article, we will look at cracking access points using WPA-PSK or WPA2-PSK using Wifite.
If you have used tools like airodump-ng, aircrack-ng etc to crack WPA access points before, you would know that the required thing to successfully crack a WPA-PSK network is a captured WPA four-way handshake.


To start wifite for cracking a WPA access point, give it the option -wpa to only target WPA networks. Also, give it a dictionary file as an input for cracking the WPA passphrase with the -dict option. In kali linux, the wordlists are stored at the location /usr/share/wordlists. Wifite will now start scanning for WPA access points.

Press Ctrl+C to give a target number. In my case, the target number is 2 which is an access point i have configured for testing purposes. The access point uses WPA2-PSK encryption with the key as “password”.

Wifite will now start listening for the handshake. Once it has found it, it will automatically start cracking the passphrase using the dictionary file that we supplied.

And as you can see, Wifite has successfully found the passphrase for the access point.
Sometimes, things may not work as smoothly. In order to capture a WPA handshake between the client and the access point, the client has to connect to the wireless network during that period when we are monitoring the network. If the client is already connected, there will be no handshake that is captured. Wifite does this by automatically sending deauthentication packets to a particular client or a broadcast deauthentication packet if it is required. You can specify the time between deauthentication packets using the -wpadt flag. Hence, when the client tries to reconnect to the access point, the handshake is captured.
You can also specify which tool you want to use to crack the passphrase once the four-way handshake has been successfully captured. By default, aircrack-ng is selected. You can also use cowpatty, pyrit or tshark to crack the passphrase.

Another cool option in Wifite is to anonymize your MAC address using the -mac option. Even though it is quite trivial using simple commands or macchanger utility to change the MAC address for a specific interface, it is good to have this feature in the tool itself. However, in order to make this work, you first have to take that specific interface for which you want to change the MAC address down to managed mode if it is in monitor mode previously. You can use the command iwconfig to check all the interfaces that are in monitor mode and then take them down using the command airmon-ng stop interface-name command. As we can see from the image below, the mon0 interface is in monitor mode.

Hence, lets take it down using the command airmon-ng stop mon0
.
Now we can add the -mac option to anonymize the MAC address. As you can see, Wifite is intelligent enough to change the MAC address to something that is similar the existing MAC address of the interface and not to something ridiculous (for e.g AA:BB:CC:DD:EE:FF) which is a giveaway.

And when you stop the capture, Wifite is nice enough to change the MAC address back to the original one.

PHV.DCXXIV.2016.0128


2015-08-27

Ten Essential WiFi Hacking Tools

Note: All the information below are from http://www.hackingtutorials.org/wifi-hacking-tutorials/ - for additional cool WiFi info visit their website. 
In this top 10 Wifi Hacking Tools we will be talking about a very popular subject: hacking wireless networks and how to prevent it from being hacked. Wifi is often a vulnerable side of the network when it comes to hacking since signals can be picked up everywhere and by anyone. Router manufacturers and ISPs turning on WPS by default makes wireless security and penetration testing even more important. With the following top 10 Wifi hacking tools we are able to test our own wireless networks for potential security issues. Let’s start off the top 10 Wifi Hacking Tools with the first tool:

1 Aircrack-ng

Aircrack is one of the most popular tools for WEP/WPA/WPA2 cracking. The Aircrack-ng suite contains tools to capture packets and handshakes, de-authenticate connected clients and generate traffic and tools to perform brute force and dictionary attacks. Aicrack-ng is an all-in-one suite containing the following tools (among others):
– Aircrack-ng for wireless password cracking
– Aireplay-ng to generate traffic and client de-authentication
– Airodump-ng for packet capturing
– Airbase-ng to configure fake access points
The Aicrack-ng suite is available for Linux and comes standard with Kali Linux. If you plan to use this tool you have to make sure your Wifi card is capable of packet injection.

Aircrack-ng aireplay-ng WPA Handshake

2 Reaver

Number 2 in the top 10 Wifi hacking tools is Reaver. Reaver is another popular tool for hacking wireless networks and targets specifically WPS vulnerabilities. Reaver performs brute force attacks against Wifi Protected Setup (WPS) registrar PINs to recover the WPA/WPA2 passphrase. Since many router manufacturers and ISPs turn on WPS by default a lot of routers are vulnerable to this attack out of the box.
In order to use Reaver you need a good signal strength to the wireless router together with the right configuration. On average Reaver can recover the passphrase from vulnerable routers in 4-10 hours, depending on the access point, signal strength and the PIN itself off course. Statistically you have a 50% chance of cracking the WPS PIN in half of the time.

Pixie Dust attack

3 Pixiewps

PixieWPS is a relatively new tool included with Kali Linux and also targets a WPS vulnerability. PixieWPS is written in C and is used to brute force the WPS PIN offline exploiting the low or non-existing entropy of vulnerable access points. This is called a pixie dust attack. PixieWPS requires a modified version of Reaver or Wifite to work with. Since this tools has become quite popular in little time, it earns the number 3 in our top 10 Wifi hacking tools list.

Pixie Dust attack

4 Wifite

Wifite is an automated tool to attack multiple wireless networks encrypted with WEP/WPA/WPA2 and WPS. On start-up Wifite requires a few parameters to work with and Wifite will do all the hard work. It will capture WPA handshakes, automatically de-authenticate connected clients, spoof your MAC address and safe the cracked passwords.


5 Wireshark

Wireshark is one of the best network protocal analyzer tools available, if not the best. With Wireshark you can analyse a network to the greatest detail to see what’s happening. Wireshark can be used for live packet capturing, deep inspection of hundreds of protocols, browse and filter packets and is multiplatform.
Wireshark is included with Kali Linux but also available for Windows and Mac. For certain features you do need a Wifi adapter which is supports promiscuous and monitoring mode.


6 oclHashcat

Number 6 in our top 10 Wifi hacking tools is oclHashcat. oclHashcat is not a dedicated Wifi hacking tool and is not included with Kali Linux, but it can do brute force and dictionary attacks on captured handshakes very fast when using a GPU. After using the Aircrack-ng suite, or any other tool, to capture the WPA handshake you can crack it with oclHashcat using your GPU. Using a GPU with oclHashcat, instead of a CPU with Aicrack-ng, will speed up the cracking process a lot. An average GPU can try about 50.000 combinations per second with oclHashcat.
oclHashcat is available for Windows and Linux and has a version for AMD and Nvidia video cards. AMD video cards require Catalyst 14.9 exactly and Nvidia video cards require ForceWare 346.x or later to work.

oclhashcat

7 Fern Wifi Cracker

Fern Wifi Cracker is a wireless security auditing and attack tool written in Python. Fern Wifi Cracker is the first dedicated Wifi hacking tool in this list which has an graphical user interface. Fern is able to crack and recover WEP, WPA and WPS keys and contains tools to perfom MiTM attacks.
Fern Wifi Cracker runs on any Linux distribution which contains the prerequisites. Fern Wifi Cracker is included with Kali Linux.


8 Wash

Wash is a tool to determine whether an access point has WPS enabled or not. You can also use Wash to check if an access point locked up WPS after a number of Reaver attempts. A lot of access points locks itself up as a security measure when brute forcing the WPS PIN. Wash is included with the Reaver package and comes as a standard tool with Kali Linux.

Wash-WPS-locks wifi hacking tools Top 10 Wifi Hacking Tools

9 Crunch

Crunch is a great and easy to use tool for generating custom wordlists which can be used for dictionary attacks. Since the success rate of every dictionary attack depends on the quality of the used wordlist, you cannot avoid creating your own wordlist. Especially when you want to create wordlists based on default router passwords. Crunch can also be piped directly to other tools like Aircrack-ng. This feature can save a lot of time since you won’t have to wait until large password lists have been generated by Crunch before you can use them.

Crunch Password List generation Top 10 Wifi Hacking Tools

10 Macchanger

Last but not least in this top 10 Wifi Hacking Tools is Macchanger. Macchanger is a little utility which can be used to spoof your MAC address to a random MAC address or you can make up your own. Spoofing your MAC address for wifi hacking might be necessary to avoid MAC filters or to mask your identity on a wireless network.

MAC Address spoofing with macchanger

2015-08-22

WIFISH: Fox Hunting with a Handheld Radio

Foxhunting with a Handheld Radio

NOTE: I've have not tried this personally but will update this blog when I get the chance to test this technique.  The information below are excerpts  from: http://www.homingin.com/equipment.html

Handie-Talkie Tricks

(Adapted from a handout given to first-timers at southern California two-meter international-style foxhunts.) 

If you are a typical ham radio operator, all you need to get started quickly and find foxes successfully is your VHF/UHF handi-talkie (HT) or scanner and some simple accessories.  

The most elementary way is called the "body fade" or "body shield" technique.  Hold your HT tight against your chest and turn around slowly, looking for the direction at which your body blocks the signal most effectively (the signal null).  At this point, the signal is coming from behind you.  Walk in the direction of the null, taking bearings at regular intervals, and observe the signal strength get stronger.

When the signal is so strong that you can't find the null, tune 5 or 10 KHz off frequency to put the signal into the skirts of the receiver's IF passband.  If your hand-held is dual-band (144/440 MHz) and you are hunting on two meters, try tuning to the much weaker third harmonic of the signal in the 70 cm band while performing the "body shield."


Disconnecting the HT's "rubber duck" antenna will knock down the signal even more.  Hearing the signal with antenna off is usually a "You are here!" indicator.  Some foxtailers wrap aluminum foil around their HTs to attenuate the signal even more.  
WARNING: If you do this, be sure to put insulating tape over the battery charging terminals on the bottom of the set first.  You might damage the radio by shorting these terminals with the foil.


The "body fade" null, which is rather shallow to begin with, can be filled in by signal reflections (multipath), nearby objects, etc.  When using this method, stay away from large buildings, chain-link fences, metal signs, and the like.  If you do not get a good null, move to a clearer location and try again.

2015-08-11

TOOLS: 'tcpdump'

12 Tcpdump Commands – A Network Sniffer Tool


How to Install tcpdump in Linux

Many of Linux distributions already shipped with tcpdump tool, if in case you don’t have it on systems, you can install it using following Yum command.
# yum install tcpdump
Once tcpdump tool is installed on systems, you can continue to browse following commands with their examples.

1. Capture Packets from Specific Interface

The command screen will scroll up until you interrupt and when we execute tcpdumpcommand it will captures from all the interfaces, however with -i switch only capture from desire interface.
# tcpdump -i eth0

tcpdump: verbose output suppressed, use -v or -vv for full protocol decode
listening on eth0, link-type EN10MB (Ethernet), capture size 65535 bytes
11:33:31.976358 IP 172.16.25.126.ssh > 172.16.25.125.apwi-rxspooler: Flags [P.], seq 3500440357:3500440553, ack 3652628334, win 18760, length 196
11:33:31.976603 IP 172.16.25.125.apwi-rxspooler > 172.16.25.126.ssh: Flags [.], ack 196, win 64487, length 0
11:33:31.977243 ARP, Request who-has tecmint.com tell 172.16.25.126, length 28
11:33:31.977359 ARP, Reply tecmint.com is-at 00:14:5e:67:26:1d (oui Unknown), length 46
11:33:31.977367 IP 172.16.25.126.54807 > tecmint.com: 4240+ PTR? 125.25.16.172.in-addr.arpa. (44)
11:33:31.977599 IP tecmint.com > 172.16.25.126.54807: 4240 NXDomain 0/1/0 (121)
11:33:31.977742 IP 172.16.25.126.44519 > tecmint.com: 40988+ PTR? 126.25.16.172.in-addr.arpa. (44)
11:33:32.028747 IP 172.16.20.33.netbios-ns > 172.16.31.255.netbios-ns: NBT UDP PACKET(137): QUERY; REQUEST; BROADCAST
11:33:32.112045 IP 172.16.21.153.netbios-ns > 172.16.31.255.netbios-ns: NBT UDP PACKET(137): QUERY; REQUEST; BROADCAST
11:33:32.115606 IP 172.16.21.144.netbios-ns > 172.16.31.255.netbios-ns: NBT UDP PACKET(137): QUERY; REQUEST; BROADCAST
11:33:32.156576 ARP, Request who-has 172.16.16.37 tell old-oraclehp1.midcorp.mid-day.com, length 46
11:33:32.348738 IP tecmint.com > 172.16.25.126.44519: 40988 NXDomain 0/1/0 (121)

2. Capture Only N Number of Packets

When you run tcpdump command it will capture all the packets for specified interface, until you Hit cancel button. But using -c option, you can capture specified number of packets. The below example will only capture 6 packets.
# tcpdump -c 5 -i eth0

tcpdump: verbose output suppressed, use -v or -vv for full protocol decode
listening on eth0, link-type EN10MB (Ethernet), capture size 65535 bytes
11:40:20.281355 IP 172.16.25.126.ssh > 172.16.25.125.apwi-rxspooler: Flags [P.], seq 3500447285:3500447481, ack 3652629474, win 18760, length 196
11:40:20.281586 IP 172.16.25.125.apwi-rxspooler > 172.16.25.126.ssh: Flags [.], ack 196, win 65235, length 0
11:40:20.282244 ARP, Request who-has tecmint.com tell 172.16.25.126, length 28
11:40:20.282360 ARP, Reply tecmint.com is-at 00:14:5e:67:26:1d (oui Unknown), length 46
11:40:20.282369 IP 172.16.25.126.53216 > tecmint.com.domain: 49504+ PTR? 125.25.16.172.in-addr.arpa. (44)
11:40:20.332494 IP tecmint.com.netbios-ssn > 172.16.26.17.nimaux: Flags [P.], seq 3058424861:3058424914, ack 693912021, win 64190, length 53 NBT Session Packet: Session Message
6 packets captured
23 packets received by filter
0 packets dropped by kernel

3. Print Captured Packets in ASCII

The below tcpdump command with option -A displays the package in ASCII format. It is a character-encoding scheme format.
# tcpdump -A -i eth0

tcpdump: verbose output suppressed, use -v or -vv for full protocol decode
listening on eth0, link-type EN10MB (Ethernet), capture size 65535 bytes
09:31:31.347508 IP 192.168.0.2.ssh > 192.168.0.1.nokia-ann-ch1: Flags [P.], seq 3329372346:3329372542, ack 4193416789, win 17688, length 196
M.r0...vUP.E.X.......~.%..>N..oFk.........KQ..)Eq.d.,....r^l......m\.oyE....-....g~m..Xy.6..1.....c.O.@...o_..J....i.*.....2f.mQH...Q.c...6....9.v.gb........;..4.).UiCY]..9..x.)..Z.XF....'|..E......M..u.5.......ul
09:31:31.347760 IP 192.168.0.1.nokia-ann-ch1 > 192.168.0.2.ssh: Flags [.], ack 196, win 64351, length 0
M....vU.r1~P.._..........
^C09:31:31.349560 IP 192.168.0.2.46393 > b.resolvers.Level3.net.domain: 11148+ PTR? 1.0.168.192.in-addr.arpa. (42)
E..F..@.@............9.5.2.f+............1.0.168.192.in-addr.arpa.....

3 packets captured
11 packets received by filter
0 packets dropped by kernel

4. Display Available Interfaces

To list number of available interfaces on the system, run the following command with -Doption.
# tcpdump -D

 1.eth0
2.eth1
3.usbmon1 (USB bus number 1)
4.usbmon2 (USB bus number 2)
5.usbmon3 (USB bus number 3)
6.usbmon4 (USB bus number 4)
7.usbmon5 (USB bus number 5)
8.any (Pseudo-device that captures on all interfaces)
9.lo

5. Display Captured Packets in HEX and ASCII

The following command with option -XX capture the data of each packet, including its link level header in HEX and ASCII format.
# tcpdump -XX -i eth0

11:51:18.974360 IP 172.16.25.126.ssh > 172.16.25.125.apwi-rxspooler: Flags [P.], seq 3509235537:3509235733, ack 3652638190, win 18760, length 196
        0x0000:  b8ac 6f2e 57b3 0001 6c99 1468 0800 4510  ..o.W...l..h..E.
        0x0010:  00ec 8783 4000 4006 275d ac10 197e ac10  ....@.@.']...~..
        0x0020:  197d 0016 1129 d12a af51 d9b6 d5ee 5018  .}...).*.Q....P.
        0x0030:  4948 8bfa 0000 0e12 ea4d 22d1 67c0 f123  IH.......M".g..#
        0x0040:  9013 8f68 aa70 29f3 2efc c512 5660 4fe8  ...h.p).....V`O.
        0x0050:  590a d631 f939 dd06 e36a 69ed cac2 95b6  Y..1.9...ji.....
        0x0060:  f8ba b42a 344b 8e56 a5c4 b3a2 ed82 c3a1  ...*4K.V........
        0x0070:  80c8 7980 11ac 9bd7 5b01 18d5 8180 4536  ..y.....[.....E6
        0x0080:  30fd 4f6d 4190 f66f 2e24 e877 ed23 8eb0  0.OmA..o.$.w.#..
        0x0090:  5a1d f3ec 4be4 e0fb 8553 7c85 17d9 866f  Z...K....S|....o
        0x00a0:  c279 0d9c 8f9d 445b 7b01 81eb 1b63 7f12  .y....D[{....c..
        0x00b0:  71b3 1357 52c7 cf00 95c6 c9f6 63b1 ca51  q..WR.......c..Q
        0x00c0:  0ac6 456e 0620 38e6 10cb 6139 fb2a a756  ..En..8...a9.*.V
        0x00d0:  37d6 c5f3 f5f3 d8e8 3316 d14f d7ab fd93  7.......3..O....
        0x00e0:  1137 61c1 6a5c b4d1 ddda 380a f782 d983  .7a.j\....8.....
        0x00f0:  62ff a5a9 bb39 4f80 668a                 b....9O.f.
11:51:18.974759 IP 172.16.25.126.60952 > mddc-01.midcorp.mid-day.com.domain: 14620+ PTR? 125.25.16.172.in-addr.arpa. (44)
        0x0000:  0014 5e67 261d 0001 6c99 1468 0800 4500  ..^g&...l..h..E.
        0x0010:  0048 5a83 4000 4011 5e25 ac10 197e ac10  .HZ.@.@.^%...~..
        0x0020:  105e ee18 0035 0034 8242 391c 0100 0001  .^...5.4.B9.....
        0x0030:  0000 0000 0000 0331 3235 0232 3502 3136  .......125.25.16
        0x0040:  0331 3732 0769 6e2d 6164 6472 0461 7270  .172.in-addr.arp
        0x0050:  6100 000c 0001                           a.....

6. Capture and Save Packets in a File

As we said, that tcpdump has a feature to capture and save the file in a .pcap format, to do this just execute command with -w option.
# tcpdump -w 0001.pcap -i eth0

tcpdump: listening on eth0, link-type EN10MB (Ethernet), capture size 65535 bytes
4 packets captured
4 packets received by filter
0 packets dropped by kernel

7. Read Captured Packets File

To read and analyze captured packet 0001.pcap file use the command with -r option, as shown below.
# tcpdump -r 0001.pcap

reading from file 0001.pcap, link-type EN10MB (Ethernet)
09:59:34.839117 IP 192.168.0.2.ssh > 192.168.0.1.nokia-ann-ch1: Flags [P.], seq 3353041614:3353041746, ack 4193563273, win 18760, length 132
09:59:34.963022 IP 192.168.0.1.nokia-ann-ch1 > 192.168.0.2.ssh: Flags [.], ack 132, win 65351, length 0
09:59:36.935309 IP 192.168.0.1.netbios-dgm > 192.168.0.255.netbios-dgm: NBT UDP PACKET(138)
09:59:37.528731 IP 192.168.0.1.nokia-ann-ch1 > 192.168.0.2.ssh: Flags [P.], seq 1:53, ack 132, win 65351, length 5

8. Capture IP address Packets

To capture packets for a specific interface, run the following command with option -n.
# tcpdump -n -i eth0

tcpdump: verbose output suppressed, use -v or -vv for full protocol decode
listening on eth0, link-type EN10MB (Ethernet), capture size 65535 bytes
12:07:03.952358 IP 172.16.25.126.ssh > 172.16.25.125.apwi-rxspooler: Flags [P.], seq 3509512873:3509513069, ack 3652639034, win 18760, length 196
12:07:03.952602 IP 172.16.25.125.apwi-rxspooler > 172.16.25.126.ssh: Flags [.], ack 196, win 64171, length 0
12:07:03.953311 IP 172.16.25.126.ssh > 172.16.25.125.apwi-rxspooler: Flags [P.], seq 196:504, ack 1, win 18760, length 308
12:07:03.954288 IP 172.16.25.126.ssh > 172.16.25.125.apwi-rxspooler: Flags [P.], seq 504:668, ack 1, win 18760, length 164
12:07:03.954502 IP 172.16.25.125.apwi-rxspooler > 172.16.25.126.ssh: Flags [.], ack 668, win 65535, length 0
12:07:03.955298 IP 172.16.25.126.ssh > 172.16.25.125.apwi-rxspooler: Flags [P.], seq 668:944, ack 1, win 18760, length 276
12:07:03.955425 IP 172.16.23.16.netbios-ns > 172.16.31.255.netbios-ns: NBT UDP PACKET(137): REGISTRATION; REQUEST; BROADCAST
12:07:03.956299 IP 172.16.25.126.ssh > 172.16.25.125.apwi-rxspooler: Flags [P.], seq 944:1236, ack 1, win 18760, length 292
12:07:03.956535 IP 172.16.25.125.apwi-rxspooler > 172.16.25.126.ssh: Flags [.], ack 1236, win 64967, length 0

9. Capture only TCP Packets.

To capture packets based on TCP port, run the following command with option tcp.
# tcpdump -i eth0 tcp

tcpdump: verbose output suppressed, use -v or -vv for full protocol decode
listening on eth0, link-type EN10MB (Ethernet), capture size 65535 bytes
12:10:36.216358 IP 172.16.25.126.ssh > 172.16.25.125.apwi-rxspooler: Flags [P.], seq 3509646029:3509646225, ack 3652640142, win 18760, length 196
12:10:36.216592 IP 172.16.25.125.apwi-rxspooler > 172.16.25.126.ssh: Flags [.], ack 196, win 64687, length 0
12:10:36.219069 IP 172.16.25.126.ssh > 172.16.25.125.apwi-rxspooler: Flags [P.], seq 196:504, ack 1, win 18760, length 308
12:10:36.220039 IP 172.16.25.126.ssh > 172.16.25.125.apwi-rxspooler: Flags [P.], seq 504:668, ack 1, win 18760, length 164
12:10:36.220260 IP 172.16.25.125.apwi-rxspooler > 172.16.25.126.ssh: Flags [.], ack 668, win 64215, length 0
12:10:36.222045 IP 172.16.25.126.ssh > 172.16.25.125.apwi-rxspooler: Flags [P.], seq 668:944, ack 1, win 18760, length 276
12:10:36.223036 IP 172.16.25.126.ssh > 172.16.25.125.apwi-rxspooler: Flags [P.], seq 944:1108, ack 1, win 18760, length 164
12:10:36.223252 IP 172.16.25.125.apwi-rxspooler > 172.16.25.126.ssh: Flags [.], ack 1108, win 65535, length 0
^C12:10:36.223461 IP mid-pay.midcorp.mid-day.com.netbios-ssn > 172.16.22.183.recipe: Flags [.], seq 283256512:283256513, ack 550465221, win 65531, length 1[|SMB]

10. Capture Packet from Specific Port

Let’s say you want to capture packets for specific port 22, execute the below command by specifying port number 22 as shown below.
# tcpdump -i eth0 port 22

tcpdump: verbose output suppressed, use -v or -vv for full protocol decode
listening on eth0, link-type EN10MB (Ethernet), capture size 65535 bytes
10:37:49.056927 IP 192.168.0.2.ssh > 192.168.0.1.nokia-ann-ch1: Flags [P.], seq 3364204694:3364204890, ack 4193655445, win 20904, length 196
10:37:49.196436 IP 192.168.0.2.ssh > 192.168.0.1.nokia-ann-ch1: Flags [P.], seq 4294967244:196, ack 1, win 20904, length 248
10:37:49.196615 IP 192.168.0.1.nokia-ann-ch1 > 192.168.0.2.ssh: Flags [.], ack 196, win 64491, length 0
10:37:49.379298 IP 192.168.0.2.ssh > 192.168.0.1.nokia-ann-ch1: Flags [P.], seq 196:616, ack 1, win 20904, length 420
10:37:49.381080 IP 192.168.0.2.ssh > 192.168.0.1.nokia-ann-ch1: Flags [P.], seq 616:780, ack 1, win 20904, length 164
10:37:49.381322 IP 192.168.0.1.nokia-ann-ch1 > 192.168.0.2.ssh: Flags [.], ack 780, win 65535, length 0

11. Capture Packets from source IP

To capture packets from source IP, say you want to capture packets for 192.168.0.2, use the command as follows.
# tcpdump -i eth0 src 192.168.0.2

tcpdump: verbose output suppressed, use -v or -vv for full protocol decode
listening on eth0, link-type EN10MB (Ethernet), capture size 65535 bytes
10:49:15.746474 IP 192.168.0.2.ssh > 192.168.0.1.nokia-ann-ch1: Flags [P.], seq 3364578842:3364579038, ack 4193668445, win 20904, length 196
10:49:15.748554 IP 192.168.0.2.56200 > b.resolvers.Level3.net.domain: 11289+ PTR? 1.0.168.192.in-addr.arpa. (42)
10:49:15.912165 IP 192.168.0.2.56234 > b.resolvers.Level3.net.domain: 53106+ PTR? 2.0.168.192.in-addr.arpa. (42)
10:49:16.074720 IP 192.168.0.2.33961 > b.resolvers.Level3.net.domain: 38447+ PTR? 2.2.2.4.in-addr.arpa. (38)

12. Capture Packets from destination IP

To capture packets from destination IP, say you want to capture packets for 50.116.66.139, use the command as follows.
# tcpdump -i eth0 dst 50.116.66.139

tcpdump: verbose output suppressed, use -v or -vv for full protocol decode
listening on eth0, link-type EN10MB (Ethernet), capture size 65535 bytes
10:55:01.798591 IP 192.168.0.2.59896 > 50.116.66.139.http: Flags [.], ack 2480401451, win 318, options [nop,nop,TS val 7955710 ecr 804759402], length 0
10:55:05.527476 IP 192.168.0.2.59894 > 50.116.66.139.http: Flags [F.], seq 2521556029, ack 2164168606, win 245, options [nop,nop,TS val 7959439 ecr 804759284], length 0
10:55:05.626027 IP 192.168.0.2.59894 > 50.116.66.139.http: Flags [.], ack 2, win 245, options [nop,nop,TS val 7959537 ecr 804759787], length 0
This article may help you to explore tcpdump command in depth and also to capture and analysis packets in future. There are number of options available, you can use the options as per your requirement. Please share if you find this article useful through our comment box.
2015-08-07

DEFCON 23: WiFi Sheep Hunt Summary of Contest

WiFi Sheep Hunt Summary of Contest:

Hello potential WiFi Sheep Hunt contestants! We have lost our Ovis aries, or Sheep for the biologically impaired. Your job as a Sheep Herder is to help us find our sheep and return them to the “farm”. 


The first Sheep Herder to successfully return all lost sheep to the “farm” will be the 1 st Prize Winner of the WiFi Sheep Hunt contest. 

This year we have 3 ways of sheep herding (playing). You choose the way you want to play, but choose carefully, as once you choose you may not switch to another way of playing. A Sheep Herder may be an individual or a team but as a team you may only choose one way of playing.
 

Sheep Herder Type 1
This type of sheep herder has a computer, tablet or other type device with wireless packet sniffing capabilities/skills and is not afraid to use them at DEF CON. These individuals are brave, very brave.


Sheep Herder Type 2 
This type of sheep herder has no computing device whatsoever, which in some cases may be a wise choice at DEF CON, but wants to join in on the fun. YES, you do not need a phone, you do not need a tablet and you do not need a computer to play as type 2 sheep herder.

Sheep Herder Type 3
This type of sheep herder has a phone, tablet or other type device with NFC reading capabilities and is not afraid to use them at DEF CON. You did make a backup image of your phone and/or tablet before you arrived didn't you?


NOTE: In years past we have frowned upon hacking our contest equipment but this year we have had change of heart, as long as you don't render it useless. 


DO NOT BRICK IT. 

Our equipment is dated, has not been patched and may be vulnerable to attacks. This is DEF CON btw. Hack at least 2 of our wireless access points and ONLY OUR WIRELESS ACCESS POINTS and prove to us YOU hacked them by changing their broadcasting SSIDs to something that identifies YOU and if no one returns all our sheep to the “farm” then you win 1st Prize. You must have signed up as a Sheep Herder Type 1 to win in this way.

2014-08-11

DEFCON 22: Badge: Code, Schematics and Info by Ken Gracey

Check out @ParallaxKen's Tweet: https://twitter.com/ParallaxKen/status/498692720018223104

http://forums.parallax.com/showthread.php/156782-DEFCON-22-Badge-Code-Schematics-and-Information-Here

DEFCON 22 Badge: Code, Schematics and Information Here!

Click image for larger version

Name: DC22Badge1.jpg
Views: 10188
Size: 97.3 KB
ID: 110164
Parallax P8X32A Multicore Microcontroller and DEFCON 22 Badge
DEFCON 22 Attendees: files you might need for the badge contest are right here!

You’ve arrived at Parallax's DEFCON 22 badge resource page. If you’re in Las Vegas and participating in the DEFCON 22 badge contest to win one of the coveted Uber badges, this page offers a starting point for resources and source code. You'll learn a bit about the contest at the DEFCON 22 Opening Ceremonies on Friday at 10:00 am.

If this is your first time to Parallax forums we welcome you! Feel free to use this forum for anything you need - our local Propeller experts will be happy to answer any questions! 


The DEFCON 22 Badge was designed and manufactured for the largest continuously running hacker and computer security convention in the world www.defcon.org. This year's DEFCON is a four-day technical session held at the Rio Hotel in Las Vegas, founded and run by Jeff Moss (DarkTangent). Ryan Clarke (@LostboY), JonnyMac (@J0nnyM@c), and Parallax designed this year’s badge as a core part of the hacking contest. Jon Williams authored the badge firmware and you will be familiar with his coding style if you've seen it before. Parallax was invited to do this project on June 1st, providing only 60 days from concept through production yet our team pulled it together and manufactured almost 14,000 units in our Rocklin, California facility in July! 

DEFCON 22 Badge Overview

The badge is based around the Propeller P8X32A 32-bit Multicore Microcontroller. The circuit consists of a Propeller (microcontroller, EEPROM, clock), an infrared LED and receiver for badge-to-badge communication, a bank of eight LEDs for visual feedback, four button touch pads and a USB circuit for data access and programming. Most importantly, this badge is useful well beyond DEFCON because it's a complete Propeller development board. All I/Os, Vss, Gnd connections are clearly ported to the side of the badge so you can solder directly to the I/O pins or jump them off to a breadboard. Stop by DEFCON’s Hardware Hacking Village to work with others on badge hacking. You’ll need a micro USB cable which you can source from one of the hardware vendors if you need to reprogram. I suggest asking Garrett Gee at Godai Group - I asked him to bring 300+ micro USB cables. 

The contest code is available as a zip archive, below. The contest code initially excludes the infrared communication method required for the contest, yet the infrared objects are included. Therefore, you're only missing a small portion of the firmware. When the contest is over, you get every piece of code including the methods that communicate with the infrared objects.

The badge types were produced in eight color schemes for different types of attendees: ARTIST, CONTEST, GOON, HUMAN, PRESS, VENDOR, UBER, and SPEAKER. The HUMAN badge was produced in eight different variants for 13 unique badge styles. 

At the DEFCON 22 opening ceremony attendees will receive key information about how the badge is used to solve the challenge. We really don’t know much about the Badge Challenge, but it’s really clear that people need to mingle to unlock some cryptology clues. Take a walk around, connect your badge to Parallax Serial Terminal to see who’ve you encountered. Everybody has access to the Propeller objects used in the top-level firmware. They're available for download below.

Propeller P8X32A Verilog Hardware Design Files Released!

Timed with DEFCON 22, Parallax has also announced that the entire Propeller Multicore Microcontroller hardware design is now released open source under the GNU General Public License v3.0. You can now access the Propeller 1 Verilog files and run them on an $89 DE0-Nano FPGA board, changing the code as you wish. 

Helpful Resources and Downloads

DEFCON 22 Badge Resources (Creative Commons 3.0), at the bottom of this post:
  • Badge Schematic Page 1 (PDF)
  • Badge Schematic Page 2 (PDF)
  • Badge Schematic (DipTrace)
  • DipTrace Layout (DipTrace)
  • dc22_badge_human - Archive [Date 2014.07.12 Time 14.32].zip - for contest, as provided on DEFCON 22 CD - absent the methods used to talk to to the infrared objects
  • DCBadgeMaster.zip - full badge source code now posted, in entirety, Sunday evening at 9:41 pm Pacific Time
Propeller Multicore Microcontroller Resources (GPL v3.0):
Feel free to ask for more information! You can ask here or find a Parallax person at DEFCON, usually in the Hardware Hacking Village. We're packing our bags this evening yet four of us are already there.

Ken Gracey
Parallax Inc.